January 8, 2024
20+ Best Slack Apps and Integrations in 2024
Our team has been together for over 10 years, using Slack for a large part of that time. With this experience...
Slack channels are the core of how Slack’s 12 million users use the platform.
These channels are what gives Slack the edge over running your business over email, instant messaging apps, or even in-person office environments. They make communication and collaboration super easy, and can be flexed to fit your organization to a T.
If you’re using Slack, you probably know, more or less, how Slack channels work. But there may still be some things you’re unaware of, which will help you use Slack more effectively. Even in our workspace, after approximately 10 years of remote work and more than 5 years on Slack, we still discover new tricks that help us improve our company’s workflow.
Read on for all you need to know about Slack channels.
Further Reading: 15 Slack Hacks to Improve Your Workflow & Productivity
Slack channels are topic-specific spaces where team members can chat, share files, and start huddles (huddles are limited to 2 people on free plans).
In paid workspaces, users can also create and share video and audio files in a Slack channel, as well as start calls.
The list of channels in your workspace shows up on the sidebar on the left hand side of the screen, each channel with a # next to it (or a padlock icon for private channels).
Every workspace starts with a #general channel, which all members are automatically added to, and can’t be deleted. After that, it’s completely up to you how you customize your channels.
On free plans, each Slack channel holds a history of the 10,000 most recent messages, which members can access via the Slack search function. For paid plans, this is unlimited – you can search through the entire history of messages in a channel.
Slack channels can be set either to public or private.
Everyone in the workspace can view and join public channels (even if they haven’t specifically been invited to the channel). Files and messages in public channels will show up for every member, even if they haven’t joined that channel.
On the other hand, private Slack channels are only visible to those who have been invited to join that channel. People need to be invited by someone who is already a member of the channel. Content and messages in private channels will only show up in a search for people who are a member of that channel.
Generally, you should use public channels wherever possible. This fosters transparency and inclusivity, and makes sure information is available for anyone who may need it.
However, if you need a channel for sensitive information, or discussions that shouldn’t be open to all your workspace members, you can create a private channel for this.
Be aware that private channels can’t be changed to public after they’ve been created – but public channels can be switched to private.
Related Article: How to Use Slack Reminders
Anyone in a workspace can create a new channel.
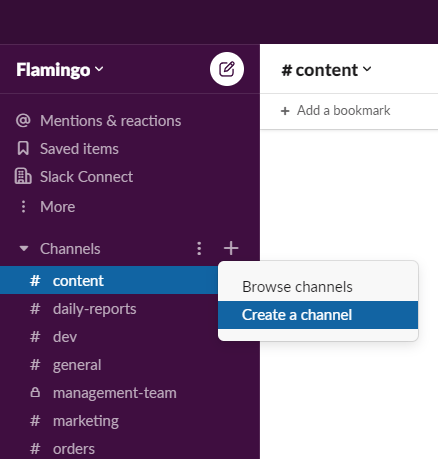
To create a channel, head over to the sidebar and hit the “plus” icon next to where it says “Channels”. Click on “Create a channel”.


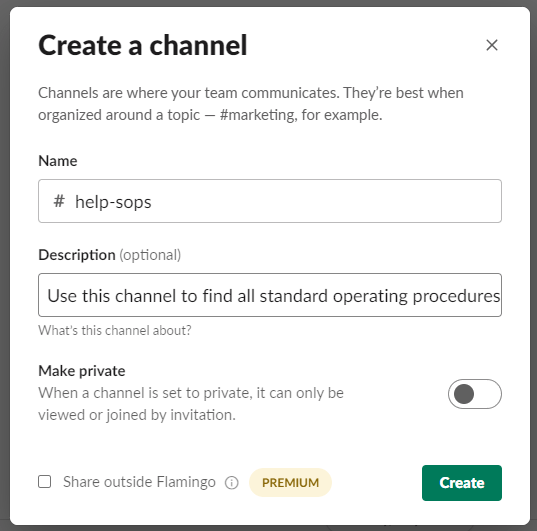
From here, choose a name for the channel, and optionally, write a description as to what this channel is about.

You can also choose here if you want to set the channel to private – but remember, if you do this, you won’t be able to change it to public later on.
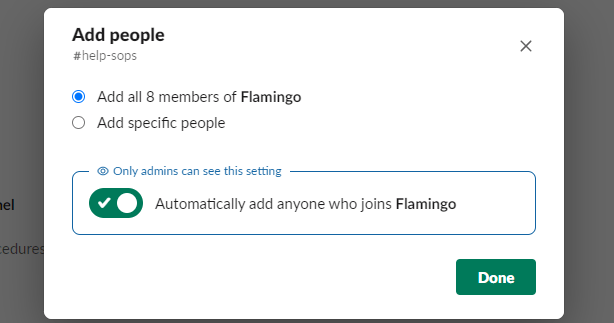
Once you’ve named your channel, just choose who to add – you can add all members of the workspace, or only specific members.

That’s it – your new Slack channel is live.
Members can also search and join any public channel in the workspace.
Get here from the same place you start when creating a new channel. Hit the “plus” icon, but this time, hit “Browse channels”.

You’ll come up with a list of all public channels (as well as private channels you’re a member of).

From here, find the channel you want to join and hit the “Join” button. You can also click on the channel to view its contents, or leave any channels you’re a member of from this screen.
Slack channels can be deleted when they’re not needed anymore. However, in most cases you’ll want to archive the channel, rather than fully deleting it.
What’s the difference?
Archiving a channel keeps all the data, files and information intact. Any messages or files from this channel will still appear in searches, and members can still view the channel’s contents. The channel can also be unarchived, restoring it to an active state, where members can join and post in this channel again.
Deleting a channel removes it from the workspace completely, along with all files and message history. This is permanent – so think whether it’s really necessary to delete the channel, instead of just archiving it.
By default, any member (except for guests) can archive a channel, as well as unarchive a channel. This can be changed in the workspace settings.
On the other hand, only workspace owners and admins can delete channels.
Delete or archive a channel by pulling up the channel details and going to the “Settings” tab. Here you’ll see the option to archive or delete the channel.

You can leave a channel by going to the “About” tab in the channel details screen. You should see the red text saying “Leave channel”.

If this is a private channel, you’ll be able to join again later. Private channels, however, you will need to be re-added by a member of the channel to view it after leaving.
Consider whether you should just mute a channel, rather than leaving it. This will send the channel to the bottom of your sidebar, gray it out, and won’t show the icon for new posts. You’ll still be a part of the channel, however, and can interact with it as normal.
Slack channels can’t be merged. If you have two separate channels that are serving the same purpose, you’ll need to go through a couple of extra steps if you want to condense their content into one.
You’ll need to use Slack’s import and export feature to export the data from one channel, and import it into another. When you import the data, you’ll do it by creating a new channel with the exact same name as the one you want to “merge” it with.
This post walks you through the import and export process, and how to merge channels when doing this.
Further Reading: The Slack App Directory features thousands of third-party apps and integrations. We put together the best and most useful apps out there, in this roundup of the Best Slack Apps.
By default, channels are sorted alphabetically. So for channels that should be grouped together, try naming them with the same prefix.
For example, you might want to start all channels related to the marketing department with #marketing- to put these in the same place in the default sidebar.
Each member can customize the order of their sidebar, though. In your preferences, you can choose between sorting alphabetically or the most recent first.
You can also “Star” a channel, which moves it to a section at the top of the sidebar.
For paid plans, you can also organize channels into sections. To do this, hit the three dots icon to bring up the channel settings. Hit “Create new section”, and name your section.


Then hit “Edit sidebar” to move channels to the sections you want.
Again, this will only change how it appears for you. It won’t change the sidebar for other users, and there’s no way to organize the channels in the sidebar for all members (aside from how you name them).
When you set up a new channel, consider if it needs to be a channel, or can just be a direct message.
Creating too many channels can result in a lot of clutter, weighing down your workflow significantly.
You should only create channels for discussing and collaborating on specific topics, that’s likely to keep going on in the future.
If you just want to create a one-off discussion with multiple team members, you can usually do this in a direct message instead. Just create a message and add multiple participants, and you can communicate there without cluttering your sidebar.
However, if you think you’ll need to search through the history of messages or files related to this topic at some point, it might be best just to create a channel. You can always archive or mute the channel later on.
Whatever you do, try to keep your Slack channels organized and easy to follow. Doing so will help you, and your whole team, use Slack at the highest level of productivity and efficiency.
For more, check out this post on best practices for using Slack channels in your workspace.
Flamingo® makes managing your team’s paid time off a breeze.